Minetest Mods (rpi minetest-server part 3)
Now that we've got our Minetest server built (see previous entry ), now it's time to learn how to install mods and games into it, and how to run multiple instances of minetest. In particular, we're going to be installing Mineclone 2.
Mods and Games in Minetest
First off, you have to understand how minetest manages content. Minetest has two concepts:
- mods: small bits of code that will add one feature to a game.
- games: big, mutually-exclusive affairs that will bundle many mods together and act as a basis for more mods. Also sometimes called a "subgame".
Next, we have to consider two games:
- Minetest Game: the basic standard game for Minetest. It's a hyper-simplified version of Minecraft with no mobs or anything. This is the basis for most Minetest mods - most Minetest mods are only playable on Minetest game.
- Mineclone 2: a game for mineclone that makes the game stylistically and gameplay-wise as similar to Minecraft as is feasible.
Minetest games and mods are typically downloaded from the Minetest Content DB), which has a nice, easy-to-use browser built into Minetest.
However, the contentDB downloader is designed to be used from the offline client - it can be executed within our online dedicated server running on the Pi4. So we have to deploy the mods and games into Minetest manually. Fortunately, it's not as bad as all that.
Mods and Games in minetest-server on Raspbian/Debian
The meat of the work we're going to be doing is in
/var/games/minetest-server/.minetest. Note that .minetest is a dot-folder,
and so is hidden from ls unless you use ls -a.
There are three directories within the "minetest" directory that we care about.
.minetest
├── games
├── mods
└── worlds
    └── world
These same three directories exist on your local copy of minetest running on your Windows machine (or Android tablet), and will contain the same kind of files.
What this means is that you can download and debug mods using the "Content DB" system in the minetest client, and then deploy the packaged-up game or world up to the minetest server.
However, to start we're going to keep it simple. We're going to download MineClone 2, create a world with it, and then deploy it to our server.
Warning about the worlds folder
Until we're setting up multiple servers and I'll go into more details, a word of
warning: The only folder in your worlds folder on the Pi4 minetest-server can
be world. We'll get into more elaborate changes later. For now - if you put
anything else in that folder, minetest-server stops working.
Getting Started with MineClone 2
MineClone 2 can be downloaded from the minetest forum where its development is publicly run, but it can also be obtained from contentdb, and the forum crashes pretty often.
Download it and unzip it into your minetest\games folder on your Windows PC.
Or you can fetch it from minetest contentdb itself, but we're going to use the
process I used when setting up. So, for example, if minetest is in c:\games,
then you should have c:\games\minetest\games\mineclone2. Remember this is an
opensource project, which means linux, which means case-sensitive filepaths. Get
used to thinking in all-lower-case.
Create a new world in minetest, using "Start Game" --> "New"
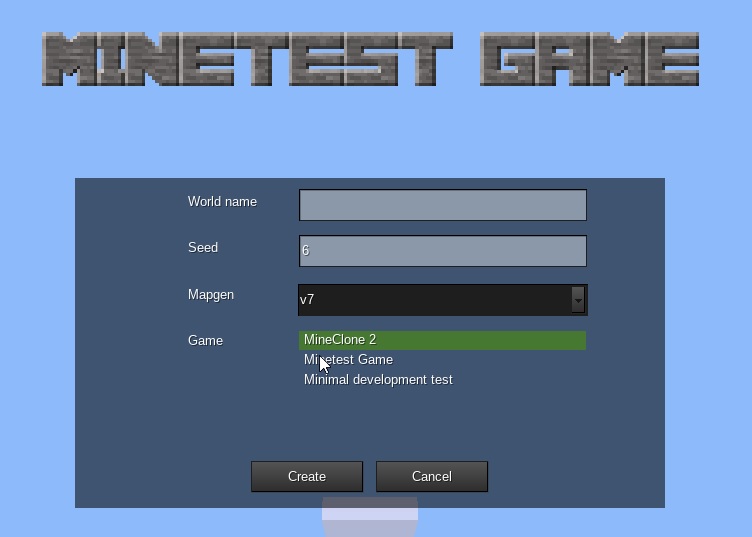
Select the "MineClone 2" game, provide a seed (I recommend 6, because I found
it had a pleasent starting area) and a name (call it "world" - I'll explain why
later), and click "Create". This will make our new Mineclone world.
Now we have the mod and the world running on our local copy of Minetest and we can deploy it to our server.
Deploying MineClone 2 and our new World
Moving files onto the Pi4
We'll be using WinSCP to copy the files to our server. We can't deploy them
direct to the target location because of permissions, so we'll copy them to
the "downloads" folder and then go from there.
Use WinSCP and your pi credentials to connect to the pi server. Let's
create a "minetest" folder under /home/pi/Downloads (aka ~/Downloads). Then,
move our world and the game in there using the WinSCP upload command.
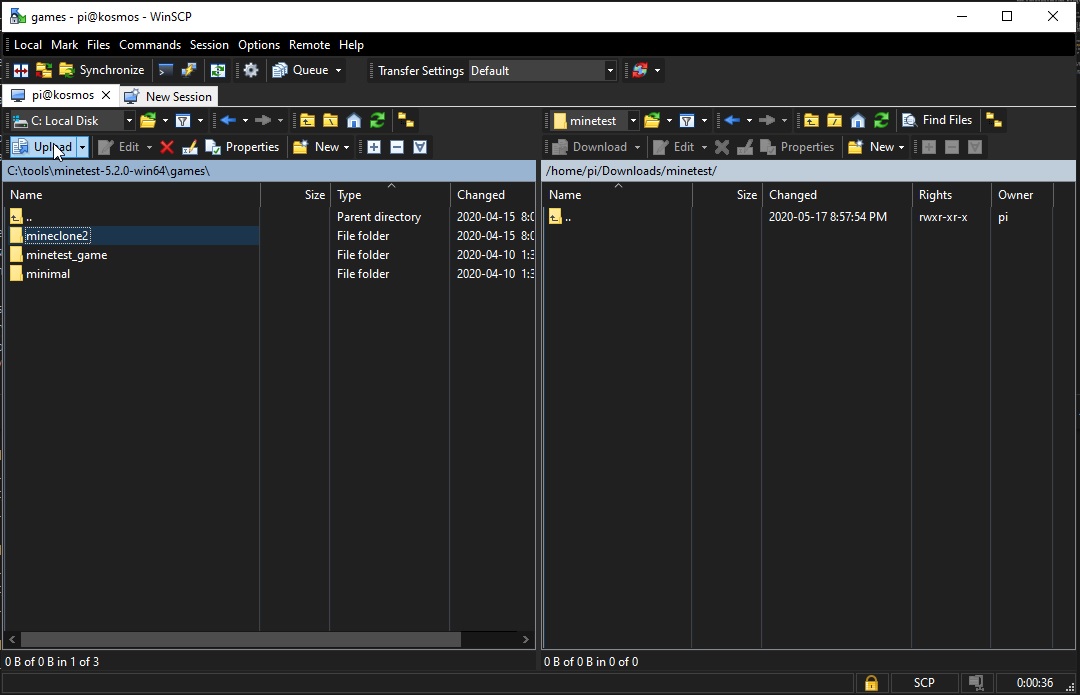
So after uploading, we should have /home/pi/Downloads/minetest/world and
/home/pi/Downloads/minetest/mineclone2.
Moving files around on the Pi4
Now that's the end of GUI work, time to switch to our console. Connect a terminal to the Pi4 server using PutTTY. We're going to copy some files around.
First, we have to stop our minetest server so that it doesn't complain when we
start moving things around. sudo systemctl stop minetest-server. Our
minetest server is shut down.
Now let's get started with the files cd /var/games/minetest-server/.minetest/
and then sudo mkdir backup. We're going to make a backup folder for our extra
worlds and the like. Next we have to remove the existing world so we can replace
it with our mineclone2 world. sudo mv ./worlds/world/ backup will move the
world into the backup folder.
Next, let's move in our new world and our new game.
If there isn't a folder called games yet, sudo mkdir games. Next, we'll
bring in mineclone2:
sudo mv /home/pi/Downloads/minetest/mineclone2 ./games/
Then, we'll bring in our world
sudo mv /home/pi/Downloads/minetest/world ./worlds/
Now we've copied the files over.
Permissions
Now we have to transfer ownership of these 2 folders to the minetest-server
user, Debian-minetest of group games.
sudo chown Debian-minetest:games ./games/mineclone2 -R
The -R means --recursive. Now the world
sudo chown Debian-minetest:games ./worlds/world -R
And now we're ready. Let's restart the server.
Restart the World
sudo systemctl start minetest-server
And we're up. On your desktop minetest, connect to the server.
Note that by default minetest stores credentials inside the world folder so we blew away all our users... you might have to restart with fresh users again.
You should find your world up and running.
Again, if anything's funny, check tail /var/log/minetest/minetest.log for
information about your server.
Mods
Mods are deployed by the same process as games, but with an extra feature - each
mod is referenced by the World. You can see this in the Minetest gui when
configuring a world - you've a long list of mods you can toggle on and off. In
the file-structure, enter your worlds/worldname folder and open world.mt in
Nano (sudo nano world.mt). Then to enable a mod that's been installed into
your mods folder, add a line to the file stating load_mod_<modname> = true.
More information on this process is here
More Worlds!
At this point we've covered most of the ways running a minetest server is different from running it locally and so you're off to the races... but what if you want to run more than one?
This is where we go back into working with Debian/systemd. In order to run more worlds, we're going to run a second minetest-server instance.
Fixing the Minetest World Folder
Okay, first we need to get into the weeds. By default minetest runs the world
named world, right? That is, the world located at
/var/games/minetest-server/.minetest/worlds/world/, right?
WRONG.
Minetest-server by default names the folder "world". But what it actually runs
is "the only world folder in /var/games/minetest-server/.minetest/worlds/".
What does that mean if there's 2 folders in
/var/games/minetest-server/.minetest/worlds/? Crashy crashy. And we're going
to put a second world in there! So before we do that, we have to make the
implicit explicit and tell minetest where to find our first world.
Before we start,
sudo systemctl stop minetest-server
Okay, we're ready to operate.
sudo nano /etc/minetest/minetest.conf
Now, look for map-dir and set it as follows
map-dir = /var/games/minetest-server/.minetest/worlds/world/
Now it no longer has to guess where to find the world, it has an exact location. So we can create a 2nd world-folder and not confuse it.
sudo systemctl start minetest-server
And check to make sure everything's hunky dory with our existing server.
Creating a new Config File
To get started on our 2nd world, we need to create a new config file. We
already have /etc/minetest/minetest.conf, we're going to be copying that file
into a new 2nd file for our 2nd minetest server instance. We can name it
whatever we like, but I like to name my worlds starting with their port number.
This is going to run on port 30002, so we'll call it 2-mineclone-survival,
since our first world was creative. Well, mine was. If yours wasn't, feel free
to make your 2nd world whatever else.
sudo cp /etc/minetest/minetest.conf /etc/minetest/2-mineclone-survival.conf
sudo nano /etc/minetest/2-mineclone-survival.conf
This will create our 2nd file and edit it. This will work much the same as the first time except we need to give it a new world-folder since our other world-folder is already in use, and set a port.
First, look for port and set it as follows
port = 30002
Next, look for map-dir and set it as follows
map-dir = /var/games/minetest-server/.minetest/worlds/2-mineclone-survival/
Now, my world is named 2-mineclone-survival but you do you. Now, mineclone
doesn't need to edit this file, so we don't have to chmod or chown it or
anything. That file is ready.
Forwarding ports
Remember earlier I told you that you had to forward 30000, but I recommended doing 30000-30010? If you didn't take my advice, take it now. We're setting up a service on 30002, you need to forward that on your router.
Creating your 2nd world
So, next step is up to you. If you want to let minetest create your 2nd world
for you, it should do that based on the settings in your conf file. I haven't
tried that. But if you have opinions on seed and want to hand-craft it in the
minetest client, then you can go through the previous process of deploying the
world into 2-mineclone-survival. Create it, move it into place, chown it,
etc.
Registering the Server
There's a simple command to create a 2nd server-instance:
sudo systemctl start minetest-server@2-mineclone-survival.service
You'll notice that I've used "2-mineclone-survival" again. That name must
match the name of your conf file. So if you named your 2nd conf file "fred"?
minetest-server@fred.service.
edit (2020-07-26): I missed a step, apparently. I noticed my server wasn't starting on restart! So there's an extra step here - we have to enable the service, which is analogous to "autostart" on Windows. Enable means start on startup.
sudo systemctl enable minetest-server@2-mineclone-survival.service
Anyhow, that should be it. 2nd world is up and running. Go see the server browser and you should find two worlds on your address, one on 30000 and one on 30002.
And you're done!